Learning how to make a seed bead pattern is easier when you can work directly on a grid built for the stitch you plan to use. Instead of trying to imagine the finished bracelet from graph paper, you can choose the beadwork layout, set the size, draw bead by bead, and preview the result before you start stitching.
If you have been wondering how to make your own seed bead patterns, a good first project is a simple repeating motif. In this tutorial, we will start with a blank Peyote 1-Drop canvas, draw one small flower, copy it across the bracelet, and inspect the finished design in both flat 2D and curved 3D views.



Why begin with one small motif?
A full bracelet can look intimidating when the canvas is empty. A small motif gives you a manageable starting point. Once its shape and colors feel right, you can reuse it to create rhythm across the design rather than drawing every flower again.
This approach also makes changes easier. You can refine the first motif, decide how much background space it needs, and then place each copy where it contributes to a balanced, intentional design.
How to make a seed bead pattern step by step
1. Choose the beadwork layout
Start a new design in Bead Designer and choose the structure you intend to stitch. The available layouts are Loom, Peyote 1-Drop, Peyote 2-Drop, Brick 1-Drop, and Brick 2-Drop.
This decision shapes the canvas itself. Loom uses aligned rows, while Peyote and Brick Stitch use offset bead positions. A useful seed bead pattern maker should reflect that structure from the beginning. For this example, choose Peyote 1-Drop.
2. Select the bead profile and pattern size
Choose the bead profile you plan to use, then enter the number of beads across and the number of beads long. In the example, the project uses Cylinder 11/0 beads on a grid that is 16 beads across and 100 beads long.
The setup screen shows approximate finished dimensions as you change the bead profile or grid size. That gives you a practical way to compare proportions before creating the canvas. For a Peyote project, choose a peyote pattern maker that provides a staggered canvas and helps you compare the estimated finished size before drawing.

3. Build a small working palette
Once the blank canvas opens, add the colors needed for the project. The flower design uses a dark background, red petals, a yellow center, and green for the stem. Keeping the working palette small makes it easy to switch colors while drawing and keeps the motif visually clear.
You can browse the built-in bead-color catalog by color group or search by name, code, brand, or hexadecimal RGB value. Add the colors you want to the project palette, select the background color, and use Fill to cover the canvas.
4. Draw the first motif bead by bead
Zoom into a comfortable part of the canvas and use the pencil tool to draw the motif. Begin with the most recognizable part—in this case, the yellow center and red petals—then add the green stem below it.
Pay attention to the staggered Peyote columns as you draw. A shape that looks symmetrical on a square pixel grid may need a small adjustment on an offset bead grid. Because each cell represents an individual bead, you can change the shape one bead at a time until it reads clearly.

5. Select, copy, and place the motif
When the flower is ready, use the area-selection tool to draw a box around the entire motif. Copy the selected area, move the new flower to another part of the bracelet, and confirm its position.
Continue copying and moving the flower to build the full pattern. Try alternating its horizontal position instead of placing every copy in a single straight line. Also leave enough dark background between flowers for each one to remain easy to recognize.
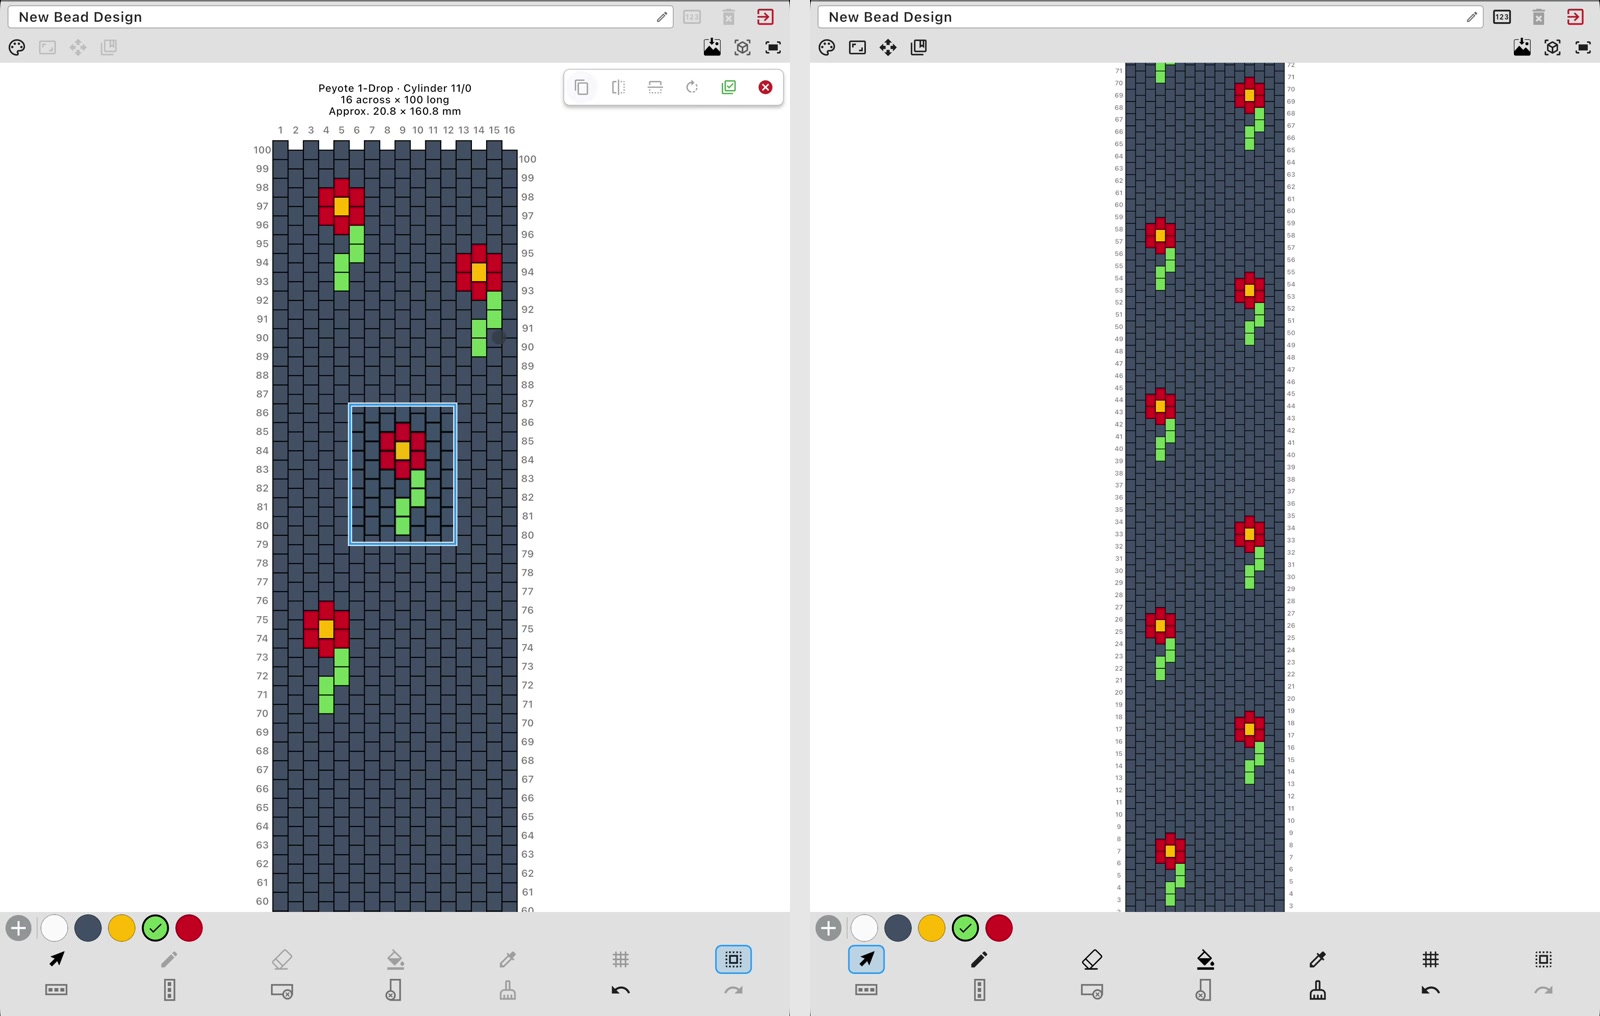
6. Check the complete pattern in 3D and 2D
Open Preview when the repeat fills the bracelet and start with the curved 3D view. Rotate the bracelet and adjust the bend to inspect how flowers positioned far apart on the flat chart appear when the design wraps around.
Then switch to the flat 2D view to see the entire arrangement at once. This is useful for spotting an uneven gap or a motif that sits too close to an edge. If one area feels crowded or empty, return to the editor, move a copied motif, and preview again.
Simple ways to improve your first original pattern
Keep the first motif compact
A small motif is easier to move, repeat, and space. It also leaves room to experiment with several arrangements before committing to the final layout.
Use the background as part of the design
Empty-looking space is not wasted space. A consistent background gives each motif a clear outline and can make a limited palette feel more deliberate.
Preview before perfecting every detail
The grid is the best place to edit individual beads, but the preview shows how the pattern reads as a whole. Move between them while designing: edit on the grid, judge the composition in 2D, and inspect the bracelet form in 3D.
Save once the pattern feels balanced
Give the design a useful name and save it to the Design Library. A clear name makes it easier to find when you are ready to continue editing or begin following the pattern.
Frequently asked questions
Do I need an image to make a seed bead pattern?
No. You can begin with a blank Loom, Peyote, or Brick Stitch canvas and draw directly on it. If you do want to begin with artwork or a photo, see our guide to creating an image to bead pattern.
Which beadwork layouts can I design?
Bead Designer includes Loom, Peyote 1-Drop, Peyote 2-Drop, Brick 1-Drop, and Brick 2-Drop layouts. This walkthrough uses Peyote 1-Drop, but the best choice is the layout you plan to stitch.
How do I choose the pattern dimensions?
Choose the bead profile first, then set the number of beads across and long. Use the approximate finished dimensions shown on the setup screen to compare sizes and proportions before creating the canvas.
Can I copy a motif instead of redrawing it?
Yes. Select the area containing the motif, copy it, move the copy, and confirm the placement. This is useful for flowers, geometric elements, borders, and other repeating details.
Can I preview a bracelet before beading it?
Yes. You can view the design as a flat 2D pattern or as a curved 3D bracelet. The preview helps you review spacing and the overall composition before working from the pattern.
Is there a seed bead pattern maker app for phones and tablets?
Yes. Bead Designer is included in Knitting Row Counter, available from the App Store and Google Play, so you can create and follow a pattern on a mobile device.
Create your own seed bead pattern
Bead Designer is built into Knitting Row Counter, so you can design and work from your pattern in the same app. Download Knitting Row Counter from the App Store or Google Play. When you are ready to bead, learn how to keep track of rows in a Peyote stitch pattern.